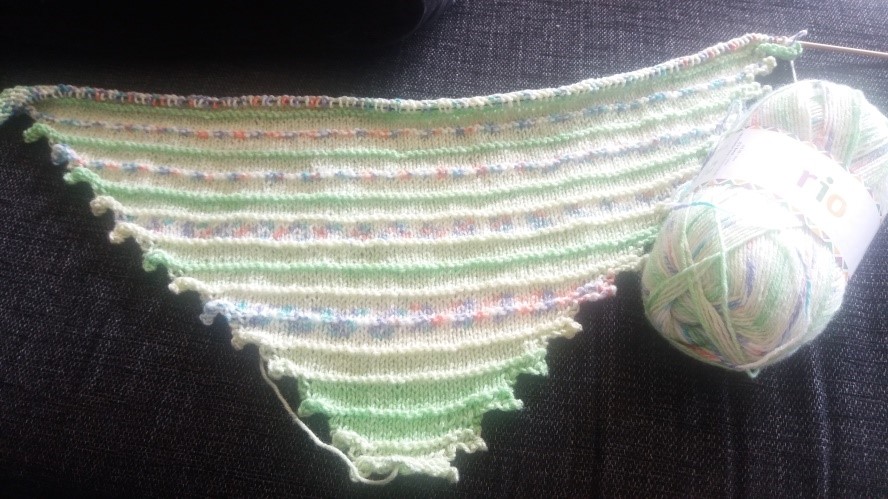
Whimsical Anna’s shawl

The shawl is knitted from mid front and starts with
only two stitches. In the first part there are regular increases along the
edges to create a nice triangle at the front, it´s then even more gradually
increased to stretch it out.
In the second part the work is divided in two and you
knit one side at a time. During this part it´s increased even more along the
edges while the part close to the neck is decreased to form a nice U-shape. The
further you knit the longer the edges get.
Completely whimsical!

Information and materials used in this project:
·
Needles
4 mm
·
1 ball of Rio from Järbo, 100 g = 300 m
Gauge:
approx. 19 stitches x 32 rows (Gauge is not important in this project.)
You can use other yarn and needle size, just be aware that
the finished size will not be the same.
Abbreviations:
st(s) stitch(es)
k knit
p
purl
lp loop
bl back
loop
k2tog knit 2 stitches together
p2tog purl 2 stitches together
RS right side
WS wrong side
kfb knit in front loop, knit in back loop. You´ve increased one
stitch.
M6 increase at
beginning of round.
Knit 1 in front loop of first stitch, do not drop stitch from needle. Put it in
front of first stitch on left needle = 1
new stitch
Repeat the procedure, e.g. M6 means make 6 new
stitches at beginning of round. M12 = make 12 new stitches etc.
Cast on 2 sts
1. RS: kfb, k1
2. WS: kfb, p2
3. RS: kfb, k3
4. WS: p
5. RS: M6, cast off 2, k3, k1 in bl, k to last st, p1
6. WS: repeat row 5
7. RS: p1, k to last st, p1
8. WS: p
9. RS: p1, k to last st, p1
10. WS: p
Repeat row 5-10, 13 times.
Continue to repeat row 5-10 the same way but increase
the amount with 1 st each repetition.
7 increased stitches:
5. RS: M7, cast off 2, k4, p1 in bl, k to last st, p1
6. WS: repeat row 5
7. RS: p1, k to last st, p1
8. WS: p
9. RS: p1, k to last st, p1
10. WS: p
8 increased stitches:
5. RS: M7, cast off 2, k4, p1 in bl, k to last st, p1
6. WS: repeat row 5
7. RS: p1, k to last st, p1
8. WS: p
9. RS: p1, k to last st, p1
10. WS: p
9 increased stitches:
5. RS: M9, cast off 2, k6, p1 in bl, k to last st, p1
6. WS: repeat row 5
7. RS: p1, k to last st, p1
8. WS: p
9. RS: p1, k to last st, p1
10. WS: p
10 increased stitches and split work in 2:
5. RS: M10, cast off 2, k7, k1 in bl, k to last st, p1
6. WS: repeat row 5
7. RS: p1, k to last st, p1
8. WS: p
9. RS: p1, k to last st, p1
10. WS: p70, cast off 17, p70

The work is now divided in
two. Put the stitches not in use on a piece of scrap yarn. The stitches along
the edge keep on increasing with 1 st each repetition as before while the
inside edge (near the neck) gradually decreases.
11 increased stitches:
5. RS: M11, cast
off 2, k8, k1 in bl, k to last 2 sts, k2tog.
6. WS: p2tog, k to last st, p1
7. RS: p1, k to last 2 sts, k2tog
8. WS: p2tog, p
9. RS: p1, k to last 2 sts, k2tog
10. WS: p2tog, p
12 increased stitches:
5 RS: M11, cast off 2, k9, k1 in bl, k to last 2 sts, k2tog.
6 WS: p2tog, k to last st, p1
7 RS: p1, k to last 2 sts, k2tog
8 WS: p2tog, p
9 RS: p1, k to last 2 sts, k2tog
10 WS: p2tog, p
Continue in the same way until you´ve made an increase
of 17 stitches.
Next row: cast off loosely.
Now it´s time to finish off next side.
Put all stitches back on the needle and start knitting
from the neck (wrong side).
11 increased stitches:
5. WS: k2 together
in the back loops, k to last st, p1
6. RS: M11, cast off 2, k8, k1 in bl, k to last 2 sts, p2tog
7. WS: p2tog, p
8. RS: p to last 2 sts, k2tog
9. WS: p2tog, p
10. RS: k to last 2 sts, p2tog
12 increased stitches:
5. WS: k2 together in the back loops, k to last st, p1
6. RS: M11, cast off 2, k9, k1 in bl, k to last 2 sts, p2tog
7. WS: p2tog, p
8. RS: p to last 2 sts, k2tog
9. WS: p2tog, p
10. RS: k to last 2 sts, p2tog
Continue in the same way until you´ve made an increase
of 17 stitches.
Next row: cast off loosely.
Block if you wish.
Pattern is for personal use only – pattern may not be changed, sold, copied or other
ways shared without my permission = copyright.
Please share where
you found the pattern in the first place. Links are so easy to share.
You may sell items made from this pattern in small amounts – Please say, write or in other way
tell the buyer who made the pattern when you sell the items.
Best,
Petra Söreskog/ Chippzan J
Inga kommentarer:
Skicka en kommentar