Visar inlägg med etikett Free pattern. Visa alla inlägg

lördag 10 april 2021

”Bumle-bee”- toiletroll bumble bee free pattern


Terms: US
Hook
3,5 mm
Yarn:  White, yellow and black Carolina (M&K) or other yarn suitable for hook 3,5 mm.
Total usage: approx 80 g.

The bumble bee is crocheted down-up with Crochodile Stitches and the rest with hdc. How to make Crocodile Stitches is on my blog, but only in Swedish. However, the photo tutorial is excellent so I think you can figure it out anyway. http://chippzan.blogspot.se/2013/02/crocodile-stitch-steg-for-steg.html

NOTE! Instead of making V-stitches (picture 2-4 in the tutorial) I made like this: * dc 1 in next 2 stiches, ch 1, skip 1 stitch* That is to make it tighter, so the toilet paper won´t show through the holes.  

 Abbreviations:

ch –chain
sc – single crochet
hdc –half double crochet
Cr St – crocodile stitch
dc – double crochet
sl st – slip stitch
st(s) – stitch(es)
tog – together
eor – end of round

Body
Color changes:
Start with white yarn and crochet according to round 1-3. Change to black and crochet round 4-5. Change to yellow and crochet round 4-5. Change to black again, crochet round 4-5. Change to yellow, crochet round 4-5. Finally change to black and crochet the rest of the body from round 6.

1.        Ch 78, form a ring with a sl st in first st.

2.       Trellis/ round with pairs of dc
Ch 3 (=1 dc), dc 1 in next st * ch 1, skip 1 st, dc 1 in each of next 2 sts* repeat *-* until eor, ch 1 and sl st in first dc. (26 pairs of dc)

3.       Crocodile Stitches
Ch 2, start making Cr St in first dc and up the next and continue till end of round. Remember to skip every other pair of dc. When you reach the end, sl st in first the very first dc of Cr St. Break yarn and fasten.

4.       Trellis/ round with pairs of dc
Fasten new yarn in the center of one of the dc pairs that is between two Cr Sts, ch 3 (= 1 dc), dc 1 in the same “hole”* ch 1, dc 2 in the center of Cr St, ch 1, dc 2 st between the 2 dc from previous round* repeat *-* until eor. Finish with a sl st in first ch/dc. (26 pairs of dc)

5.       Crocodile Stitches according to round 3.


Repeat round 4 and 5 until you have 5 rounds of Cr St, ending with a round of Cr St.


6.       The rest of the body is crocheted with hdc and with black.
First round:
Ch 2, hdc 1 in the center of Cr St from previous round *ch 1, hdc 1in ch from prev round, ch 1, hdc 2 between the two dc from prev round, ch 1, hdc 1 in ch, ch 1, hdc 2 in the center of Cr St* repeat *-* and AT THE SAME TIME increase 2 hdc on the round.
(80 hdc)

7.       Make a total of 5-6 rounds of hdc, depending on the hight of your toilet roll (80 hdc/round)

8.       Folding edge
Crochet in the back loops only from now on and do not end with a sl st after each round. Place a marker to mark beginning of round and move the marker as you go.  Just keep crocheting round-round AT THE SAME TIME decreas like this:
* hdc 8, hdc 2 together* until eor.

9.       Continue, without the sl st and ch: *hdc 7, hdc 2 tog.* until eor.

10.   *hdc 6, hdc 2 tog* until eor.

11.   *hdc 5, hdc 2 tog* until eor.

12.   *hdc 4, hdc 2 tog* until eor.

13.   *hdc 3, hdc 2 tog* until eor.

14.   *hdc 2, hdc 2 tog* until eor, sc 1 in next stitch and make a sl st in next to finish of the round. Break yarn and fasten.


Wings, make 2

Ch 25, sl st 1 in very first st, ch 25 and sl st 1 in first st of this last chain. Break yarn and sew/fasten the wings to the sides.


Large eye

1.       Magic ring, sc 6 (6)

2.       Ch 1 * sc 2 in each st* until eor, end with a sl st (12)

3.       Ch 1 *sc 1, sc 2 in next* until eor, end with a sl st. (18)

4.       Ch 1 *sc 1 in next 2 sts, sc 2 in next st* until eor, end with a sl st. (24)

5.       Make the pupil by sewing a few stiches before fastening the eye to the body.

Small eye

Do according to Large eye but skip round 4.


Legs, make 6

Ch 14, sl st 1 in 4th st from hook. Continue with sl sts along the chain until all sts are done. Break yarn.

1.       Top leg is sewn between the two black Cr St under the yellow, see arrow no 1. Fasten on the inside.

2.       Middle leg is sewn between the two yellow Cr St under the black, see arrow no 2. Fasten on the inside.

1.       Last leg is sewn between the two white Cr St under the black and under the middle leg. Fasten on the inside.


Antennas
Ch 17, sl st 1 in 4th st from hook. Continue with sl st along the ch until all sts are done, ch another 17, sl st in 4th st from hook and sl st until all sts are done. You are now at the center of the antennas. Break yarn.  

Fasten the antennas with a pin needle on top of the head, at the center/beginning/end of the antennas. Sew along 3 sts from center and out, a total of about 6 sts along the center. Fasten on the inside.

Instructions
Pull out the hard paper in the center of the toilet roll and pull the bumble-bee onto the roll. This way the paper is pulled from the center - out. It´s perfect for the kitchen, on picnics, in the kids rooms, during cold seasons etc. If the bumble-bee has a tendency to sack when the paper is running low, you can cut a piece of cardboard from eg a pasta box and put inside. Cut a piece that is approx. 10 cm x 40 cm, tape the short ends together around a new toilet roll and put it in the bumble-bee.

Good luck with your toilet roll bumble bee J

No, it´s not ok to sell finished items made from this pattern. You are free to make as many bumble bees as you want to yourself or as gifts. If you wish to sell for charity, no problem at all, just email me and I´ll send you a permission slip. This is because there are bad “apples” out there who do not respect copyright. Thank you for your understanding.

If you want to read more of copyright laws in Sweden please do so at http://www.regeringen.se/content/1/c6/01/22/48/8d08dde0.pdf or on my blog http://chippzan.blogspot.se/p/copyright.html

Any questions, please send me a mail J

Happy crocheting!
/  Petra Söreskog

fredag 12 mars 2021

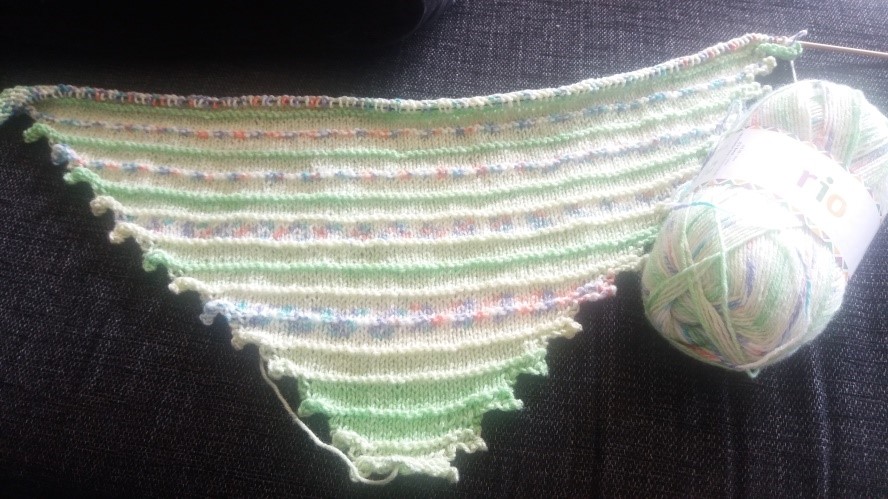
Whimsical Anna’s shawl - free pattern


Whimsical Anna’s shawl


The shawl is knitted from mid front and starts with only two stitches. In the first part there are regular increases along the edges to create a nice tri­angle at the front, it´s then even more gradually increased to stretch it out.


In the second part the work is divided in two and you knit one side at a time. During this part it´s increased even more along the edges while the part close to the neck is decreased to form a nice U-shape. The further you knit the longer the edges get.


Completely whimsical!


Information and materials used in this project:

·         Needles 4 mm

·         1 ball of Rio from Järbo, 100 g = 300 m

Gauge: approx. 19 stitches x 32 rows (Gauge is not important in this project.)

Size
125 cm from mid front along the edges to the tip. 
The top edge measures 220 cm (That is 75 cm + 70 cm U-shape  + 75 cm) The triangle in front measures = 33 cm from tip to cast off edge in front and 83 cm across the triangle before it´s divided in two parts.

You can use other yarn and needle size, just be aware that the finished size will not be the same. 


Abbreviations:

st(s)  stitch(es)

k       knit

p       purl

lp      loop

bl      back loop

k2tog knit 2 stitches together

p2tog purl 2 stitches together

RS     right side

WS    wrong side

kfb    knit in front loop, knit in back loop. You´ve increased one stitch.  

M6    increase at beginning of round.

Knit 1 in front loop of first stitch, do not drop stitch from needle. Put it in front of first stitch on left needle  = 1 new stitch

Repeat the procedure, e.g. M6 means make 6 new stitches at beginning of round. M12 = make 12 new stitches etc. 


Cast on 2 sts

1.   RS: kfb, k1                                                                                                

2.   WS: kfb, p2                                                                                               

3.   RS: kfb, k3                                                                                                 

4.   WS: p                                                                                                         

5.   RS: M6, cast off 2, k3, k1 in bl, k to last st, p1                                      

6.   WS: repeat row 5                                                                                    

7.   RS: p1, k to last st, p1

8.   WS: p

9.   RS: p1, k to last st, p1

10. WS: p


Repeat row 5-10, 13 times.


Continue to repeat row 5-10 the same way but increase the amount with 1 st each repetition.


7 increased stitches:

5.  RS: M7, cast off 2, k4, p1 in bl, k to last st, p1                                             

6.  WS: repeat row 5                                                                                          

7.  RS: p1, k to last st, p1

8.  WS: p

9.  RS: p1, k to last st, p1

10. WS: p


8 increased stitches:

5.   RS: M7, cast off 2, k4, p1 in bl, k to last st, p1                                             

6.   WS: repeat row 5                                                                                          

7.   RS: p1, k to last st, p1

8.   WS: p

9.   RS: p1, k to last st, p1

10. WS: p


9 increased stitches:

5.    RS: M9, cast off 2, k6, p1 in bl, k to last st, p1                                             

6.    WS: repeat row 5                                                                                          

7.    RS: p1, k to last st, p1

8.    WS: p

9.    RS: p1, k to last st, p1

10.  WS: p


10 increased stitches and split work in 2:

5.   RS: M10, cast off 2, k7, k1 in bl, k to last st, p1                                            

6.   WS: repeat row 5                                                                                          

7.   RS: p1, k to last st, p1

8.   WS: p

9.   RS: p1, k to last st, p1

10. WS: p70, cast off 17, p70


The work is now divided in two. Put the stitches not in use on a piece of scrap yarn. The stitches along the edge keep on increasing with 1 st each repetition as before while the inside edge (near the neck) gradually de­creases.


11 increased stitches:

5.     RS: M11, cast off 2, k8, k1 in bl, k to last 2 sts, k2tog.                                 

6.     WS: p2tog, k to last st, p1                                                                            

7.     RS: p1, k to last 2 sts, k2tog

8.    WS: p2tog, p

9.    RS: p1, k to last 2 sts, k2tog

10.   WS: p2tog, p


12 increased stitches:

5    RS: M11, cast off 2, k9, k1 in bl, k to last 2 sts, k2tog.                                 

6   WS: p2tog, k to last st, p1                                                                            

7    RS: p1, k to last 2 sts, k2tog

8    WS: p2tog, p

9    RS: p1, k to last 2 sts, k2tog

10  WS: p2tog, p


Continue in the same way until you´ve made an increase of 17 stitches.
 Next row: cast off loosely.


Now it´s time to finish off next side.


Put all stitches back on the needle and start knitting from the neck (wrong side).


11 increased stitches:

5.     WS: k2 together in the back loops, k to last st, p1                                       

6.     RS: M11, cast off 2, k8, k1 in bl, k to last 2 sts, p2tog                                  

7.     WS: p2tog, p

8.     RS: p to last 2 sts, k2tog

9.     WS: p2tog, p

10.   RS: k to last 2 sts, p2tog


12 increased stitches:

5.   WS: k2 together in the back loops, k to last st, p1                                      

6.   RS: M11, cast off 2, k9, k1 in bl, k to last 2 sts, p2tog                                  

7.   WS: p2tog, p

8.   RS: p to last 2 sts, k2tog

9.   WS: p2tog, p

10. RS: k to last 2 sts, p2tog


Continue in the same way until you´ve made an increase of 17 stitches.
 Next row: cast off loosely.


Block if you wish.


Pattern is for personal use only – pattern may not be changed, sold, cop­ied or other ways shared without my permission = copyright.


Please share where you found the pattern in the first place. Links are so easy to share.


You may sell items made from this pattern in small amounts – Please say, write or in other way tell the buyer who made the pattern when you sell the items.  


Best,

Petra Söreskog/ Chippzan J