Visar inlägg med etikett Knitting. Visa alla inlägg

torsdag 20 juli 2023

Knitted wire art

Hej! 
Hur har ni det?
Här har det varit kämpigt en längre tid. Kroppen mår fortfarande inte bra så det är segt och motigt. 

Min kreativitet har legat i dvala senaste åren känns det som.

Ibland poppar det till och jag försöker hänga på medan kreativiteten pågår, skapar lite, testar nytt eller gammalt, små projekt och experiment i ett tappert försök att komma igång.
Nu har jag hamnat i "knitted wire art" läget och är i en lärningskurva. 

Igår blev det först en tulpan 🌷 till grabben som fyllde 24 år. 
Vilket inte går ihop eftersom jag bara är 28. Hehe.🤪 
Jisses, tiden bara rusar iväg. 😮‍💨

Och ett familjehjärta. 💕


Fortsätter på "ståltrådstemat" och testar mig fram. Det blev ett litet "L"-hänge till mor. 

Hoppas ni har det bra och njuter av sommaren trots alla väderomslag. Själv tycker jag att det är skönt att det inte är så varmt. Jag vet att många älskar värmen som varit mer tropisk än svensk senare åren men jag föredrar detta, ca 20-25 grader, vind, sol och regn samt svala nätter. Mums! 😁 

Ta hand om er ❤️

fredag 12 mars 2021

Whimsical Anna’s shawl - free pattern


Whimsical Anna’s shawl


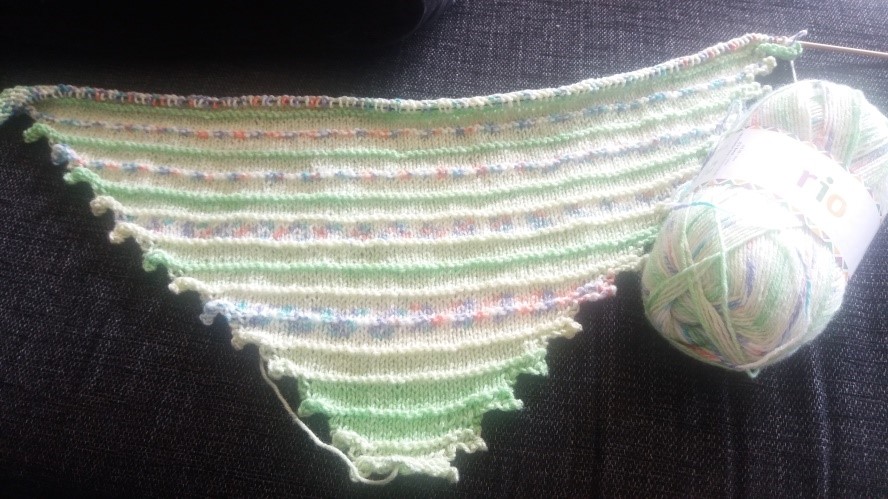
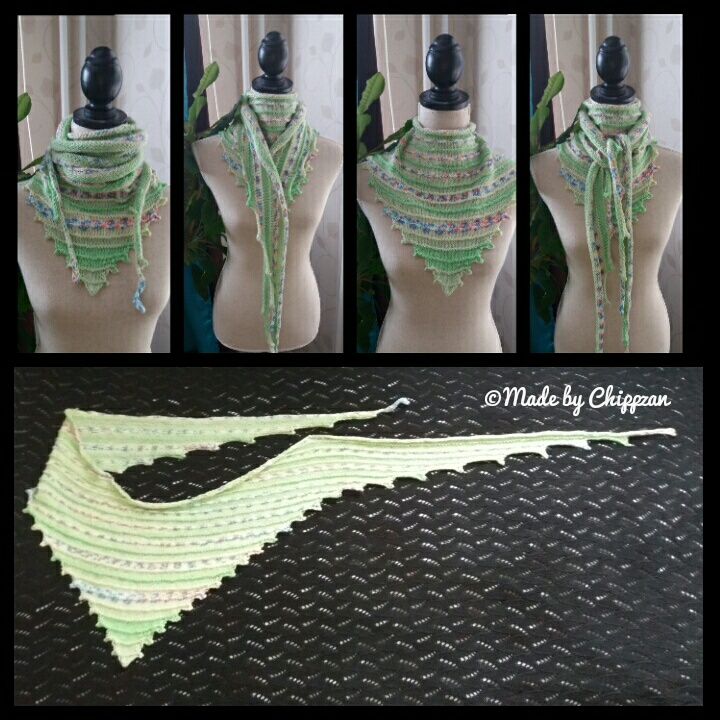
The shawl is knitted from mid front and starts with only two stitches. In the first part there are regular increases along the edges to create a nice tri­angle at the front, it´s then even more gradually increased to stretch it out.


In the second part the work is divided in two and you knit one side at a time. During this part it´s increased even more along the edges while the part close to the neck is decreased to form a nice U-shape. The further you knit the longer the edges get.


Completely whimsical!


Information and materials used in this project:

·         Needles 4 mm

·         1 ball of Rio from Järbo, 100 g = 300 m

Gauge: approx. 19 stitches x 32 rows (Gauge is not important in this project.)

Size
125 cm from mid front along the edges to the tip. 
The top edge measures 220 cm (That is 75 cm + 70 cm U-shape  + 75 cm) The triangle in front measures = 33 cm from tip to cast off edge in front and 83 cm across the triangle before it´s divided in two parts.

You can use other yarn and needle size, just be aware that the finished size will not be the same. 


Abbreviations:

st(s)  stitch(es)

k       knit

p       purl

lp      loop

bl      back loop

k2tog knit 2 stitches together

p2tog purl 2 stitches together

RS     right side

WS    wrong side

kfb    knit in front loop, knit in back loop. You´ve increased one stitch.  

M6    increase at beginning of round.

Knit 1 in front loop of first stitch, do not drop stitch from needle. Put it in front of first stitch on left needle  = 1 new stitch

Repeat the procedure, e.g. M6 means make 6 new stitches at beginning of round. M12 = make 12 new stitches etc. 


Cast on 2 sts

1.   RS: kfb, k1                                                                                                

2.   WS: kfb, p2                                                                                               

3.   RS: kfb, k3                                                                                                 

4.   WS: p                                                                                                         

5.   RS: M6, cast off 2, k3, k1 in bl, k to last st, p1                                      

6.   WS: repeat row 5                                                                                    

7.   RS: p1, k to last st, p1

8.   WS: p

9.   RS: p1, k to last st, p1

10. WS: p


Repeat row 5-10, 13 times.


Continue to repeat row 5-10 the same way but increase the amount with 1 st each repetition.


7 increased stitches:

5.  RS: M7, cast off 2, k4, p1 in bl, k to last st, p1                                             

6.  WS: repeat row 5                                                                                          

7.  RS: p1, k to last st, p1

8.  WS: p

9.  RS: p1, k to last st, p1

10. WS: p


8 increased stitches:

5.   RS: M7, cast off 2, k4, p1 in bl, k to last st, p1                                             

6.   WS: repeat row 5                                                                                          

7.   RS: p1, k to last st, p1

8.   WS: p

9.   RS: p1, k to last st, p1

10. WS: p


9 increased stitches:

5.    RS: M9, cast off 2, k6, p1 in bl, k to last st, p1                                             

6.    WS: repeat row 5                                                                                          

7.    RS: p1, k to last st, p1

8.    WS: p

9.    RS: p1, k to last st, p1

10.  WS: p


10 increased stitches and split work in 2:

5.   RS: M10, cast off 2, k7, k1 in bl, k to last st, p1                                            

6.   WS: repeat row 5                                                                                          

7.   RS: p1, k to last st, p1

8.   WS: p

9.   RS: p1, k to last st, p1

10. WS: p70, cast off 17, p70


The work is now divided in two. Put the stitches not in use on a piece of scrap yarn. The stitches along the edge keep on increasing with 1 st each repetition as before while the inside edge (near the neck) gradually de­creases.


11 increased stitches:

5.     RS: M11, cast off 2, k8, k1 in bl, k to last 2 sts, k2tog.                                 

6.     WS: p2tog, k to last st, p1                                                                            

7.     RS: p1, k to last 2 sts, k2tog

8.    WS: p2tog, p

9.    RS: p1, k to last 2 sts, k2tog

10.   WS: p2tog, p


12 increased stitches:

5    RS: M11, cast off 2, k9, k1 in bl, k to last 2 sts, k2tog.                                 

6   WS: p2tog, k to last st, p1                                                                            

7    RS: p1, k to last 2 sts, k2tog

8    WS: p2tog, p

9    RS: p1, k to last 2 sts, k2tog

10  WS: p2tog, p


Continue in the same way until you´ve made an increase of 17 stitches.
 Next row: cast off loosely.


Now it´s time to finish off next side.


Put all stitches back on the needle and start knitting from the neck (wrong side).


11 increased stitches:

5.     WS: k2 together in the back loops, k to last st, p1                                       

6.     RS: M11, cast off 2, k8, k1 in bl, k to last 2 sts, p2tog                                  

7.     WS: p2tog, p

8.     RS: p to last 2 sts, k2tog

9.     WS: p2tog, p

10.   RS: k to last 2 sts, p2tog


12 increased stitches:

5.   WS: k2 together in the back loops, k to last st, p1                                      

6.   RS: M11, cast off 2, k9, k1 in bl, k to last 2 sts, p2tog                                  

7.   WS: p2tog, p

8.   RS: p to last 2 sts, k2tog

9.   WS: p2tog, p

10. RS: k to last 2 sts, p2tog


Continue in the same way until you´ve made an increase of 17 stitches.
 Next row: cast off loosely.


Block if you wish.


Pattern is for personal use only – pattern may not be changed, sold, cop­ied or other ways shared without my permission = copyright.


Please share where you found the pattern in the first place. Links are so easy to share.


You may sell items made from this pattern in small amounts – Please say, write or in other way tell the buyer who made the pattern when you sell the items.  


Best,

Petra Söreskog/ Chippzan J  


tisdag 12 juni 2018

Felicity Poncho

Stickar just nu på en poncho, mönster från Drops Garnstudio "Felicity" . Vi har en KAL i min FB-grupp så fler stickar denna samtidigt ☺️.

Jag stickar med Drops ❤️ You Garnet nr 1 i grönt och naturvit. Testar att "randa in" det ljusare garnet. Jag får se hur det ser ut. Har dock inte tillräckligt med garn för att sticka den enfärgad så det blir ett experiment. Kanske blir den klar till midsommar? 


tisdag 3 januari 2017

Nytt mönster - New pattern

Mössa med flätor och pompom / Beanie with braids and pompom
 
Fick ett underbart garn av grabben i julklapp: 
Malabrigo "Rios", som är ett rent merino ull som går att tvätta (superwash).

I got a lovely yarn from my son for Christmas:
Malabrigo "Rios", pure merino superwash.


Nytt garn innebär inspiration till ett helt nytt mönster :-) Mössan är ribbstickad med flätor, vilket gör den otroligt stretchig så den passar de flesta, både damer och herrar. 

New yarn means inspiration for a new pattern :-). The beanie is knit in rib and braids, which makes is very stretchy, so it fits most ladies and gentlemen.

Garnet ligger på 100 g härvor och räckte till både en mössa och en pompom.   
The yarn comes in 100 grams and is enough for both beanie and pompom.
 Här är mössan taggad med en egen stämplat hjärta :-) 
I stamp my own tags :-)


http://www.ravelry.com/patterns/library/mossa-med-flator


fredag 11 november 2016

Cowl with edges


 This is not an exact pattern but a description of how I used the Autumn Warmers and made a cowl to pull over the head. Due to copyright you need to download the pattern for the wristwarmers first, made by Strikkelisa on Ravelry. 


The cowl is first made into a long wonky thing, then folded and knitted together into a cowl.

Download Autumn Warmers and use the pattern with the HOLES and knit row 1-12 but first...
  • skip/remove the "lift first stitch" that is written first on every uneven row.
  • Skip/remove the last "knit2together" on every even rows.
M1 - make 1 by knitting in front and back loop before dropping the stitch from the needle.
DS - doublestitch = lift first stitch on row to the right needle with yarn in front of work, pull the yarn over the needle all the way to the back to create a stitch with 2 "legs". This stitch is counted as 1 and you knit through both "legs" when it´s time to knit it. 

Materials:
  • Needles 4 mm + one extra needle for knitting the work together into a cowl at the end.
  • The redish cowl is knitted in Extra Merino by Schachenmayr and the greyish one is in Delight from Drops. Two totally different types of yarn, I know, but both works and are made with the same size of needles. :-) Obviously the grey one is thinner than the red one.

Let´s get going:
Cast on 9 stitches

1st edge
Row 1) k1, continue as in row 1 according to Strikkelisas pattern
Row 2) row 2 according to Strikkelisas pattern, k1
Row 3) k1, row 3 according to Strikkelisas pattern
Row 4) row 4 according to Strikkelisas pattern, k1
Row 5) k1, M1 (=in first stitch on pattern), continue as in row 5 according to Strikkelisas pattern
Row 6) row 6 according to Strikkelisas pattern, k2
Row 7) k2, row 7 according to Strikkelisas pattern
Row 8) row 8 according to Strikkelisas pattern, k2
Row 9) k2, row 9 according to Strikkelisas pattern
Row 10) row 10 according to Strikkelisas pattern, k2
Row 11) k1, M1, k1, row 11 according to Strikkelisas pattern
Row 12) row 12 according to Strikkelisas pattern, k3

2-5th edge - knit as 1st edge, increase/ M1 1 on row 5 and row 11

6-10th edge - knit the same way but without any increasings.

11-13th edge - increase on every uneven row

14-15th edge - short rows:
Row 2) turn after 6 stitches
Row 3) DS, continue as before
Row 4) knit to the DS, knit the DS as one stitch (the two legs are knitted together as one), k6, turn.
Row 5) DS, continue as before
Row 6) knit all stitches till the end of row

Continue until you´ve made 2 whole edges with short rows.

Now the work looks like this :-) All wonky and uneven.

Fold the work as shown in pic, with the big piece in front.


Fold down the last edge to shape it into a cowl.

Pick up stitches:
Count the stitches on the needle, pick up as many, minus 2 stitches along the edge. Starting in the center of the very first edge.

Knit together and cast off at the same time:
Now hold the two needles together, one in front of the other, with the stitches lining up beside each other and take out the extra needle.
1) Put the extra needle into the first stitch on the front needle as if to knit, BUT continue and put the needle into first stitch on the second needle in the back - yarn over, pull through both stitches, drop the stitches off the needles. = Knit 2 stitches together as one
2) Repeat as above: knit 2 together - one stitch from front needle and one stitch from the back needle. Now you have two stitches on the right needle, lift the very first stitch over the last = cast off 1.

Repeat the knit2together and cast off until all stitches are done. 

Break yarn and fasten the ends.

I think I got everything right, but if you have any questions, don´t hesitate to contact me :-)

Ta da!


måndag 26 september 2016

Whimsical Anna´s Shawl - new knitting pattern up and running

This shawl is started as a triangle but when it reaches 33 cm wide it begins to stretch out. It´s divided in two parts and stretched out even more. This makes it a perfect fit for those who don´t like it when it gets too bulky around the neck but still wants that piece of triangle to cover the front when it´s chilly outside. When worn as a shawl over the  shoulders it has long enough sides to wrap around to make it stay comfortable. 

I hope you´ll love the design!

Pattern on Ravelry: http://www.ravelry.com/patterns/library/vimsiga-annas-sjal

Pattern on Craftsy: will soon be up and running - try to use the SEARCH bar for this pattern.