Visar inlägg med etikett Shawl. Visa alla inlägg

fredag 12 mars 2021

Whimsical Anna’s shawl - free pattern


Whimsical Anna’s shawl


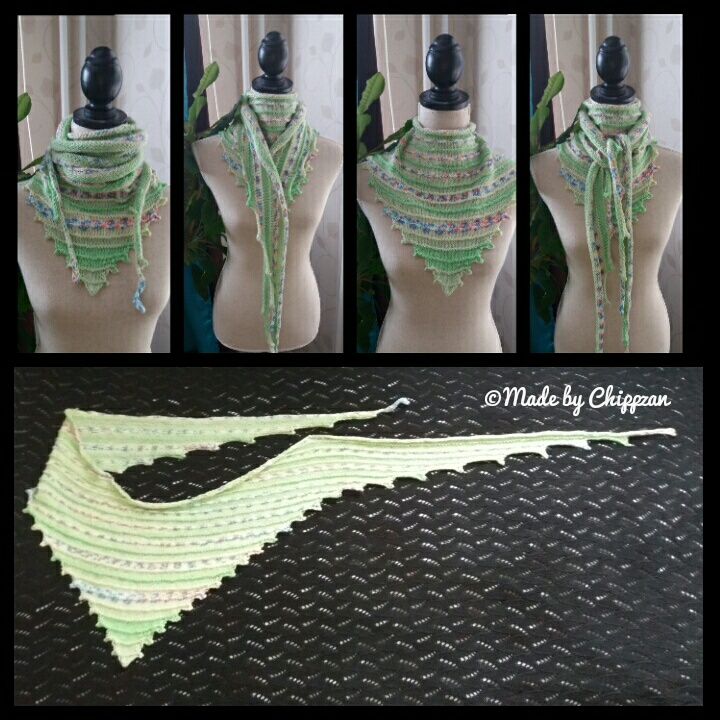
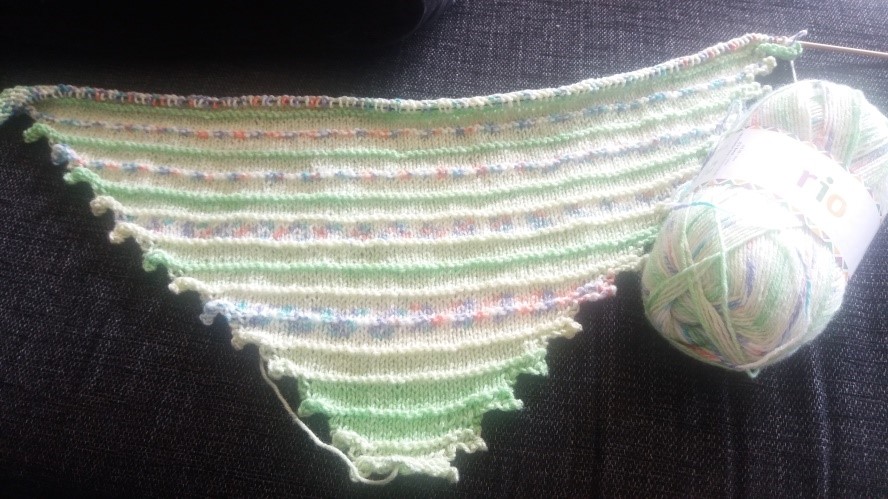
The shawl is knitted from mid front and starts with only two stitches. In the first part there are regular increases along the edges to create a nice tri­angle at the front, it´s then even more gradually increased to stretch it out.


In the second part the work is divided in two and you knit one side at a time. During this part it´s increased even more along the edges while the part close to the neck is decreased to form a nice U-shape. The further you knit the longer the edges get.


Completely whimsical!


Information and materials used in this project:

·         Needles 4 mm

·         1 ball of Rio from Järbo, 100 g = 300 m

Gauge: approx. 19 stitches x 32 rows (Gauge is not important in this project.)

Size
125 cm from mid front along the edges to the tip. 
The top edge measures 220 cm (That is 75 cm + 70 cm U-shape  + 75 cm) The triangle in front measures = 33 cm from tip to cast off edge in front and 83 cm across the triangle before it´s divided in two parts.

You can use other yarn and needle size, just be aware that the finished size will not be the same. 


Abbreviations:

st(s)  stitch(es)

k       knit

p       purl

lp      loop

bl      back loop

k2tog knit 2 stitches together

p2tog purl 2 stitches together

RS     right side

WS    wrong side

kfb    knit in front loop, knit in back loop. You´ve increased one stitch.  

M6    increase at beginning of round.

Knit 1 in front loop of first stitch, do not drop stitch from needle. Put it in front of first stitch on left needle  = 1 new stitch

Repeat the procedure, e.g. M6 means make 6 new stitches at beginning of round. M12 = make 12 new stitches etc. 


Cast on 2 sts

1.   RS: kfb, k1                                                                                                

2.   WS: kfb, p2                                                                                               

3.   RS: kfb, k3                                                                                                 

4.   WS: p                                                                                                         

5.   RS: M6, cast off 2, k3, k1 in bl, k to last st, p1                                      

6.   WS: repeat row 5                                                                                    

7.   RS: p1, k to last st, p1

8.   WS: p

9.   RS: p1, k to last st, p1

10. WS: p


Repeat row 5-10, 13 times.


Continue to repeat row 5-10 the same way but increase the amount with 1 st each repetition.


7 increased stitches:

5.  RS: M7, cast off 2, k4, p1 in bl, k to last st, p1                                             

6.  WS: repeat row 5                                                                                          

7.  RS: p1, k to last st, p1

8.  WS: p

9.  RS: p1, k to last st, p1

10. WS: p


8 increased stitches:

5.   RS: M7, cast off 2, k4, p1 in bl, k to last st, p1                                             

6.   WS: repeat row 5                                                                                          

7.   RS: p1, k to last st, p1

8.   WS: p

9.   RS: p1, k to last st, p1

10. WS: p


9 increased stitches:

5.    RS: M9, cast off 2, k6, p1 in bl, k to last st, p1                                             

6.    WS: repeat row 5                                                                                          

7.    RS: p1, k to last st, p1

8.    WS: p

9.    RS: p1, k to last st, p1

10.  WS: p


10 increased stitches and split work in 2:

5.   RS: M10, cast off 2, k7, k1 in bl, k to last st, p1                                            

6.   WS: repeat row 5                                                                                          

7.   RS: p1, k to last st, p1

8.   WS: p

9.   RS: p1, k to last st, p1

10. WS: p70, cast off 17, p70


The work is now divided in two. Put the stitches not in use on a piece of scrap yarn. The stitches along the edge keep on increasing with 1 st each repetition as before while the inside edge (near the neck) gradually de­creases.


11 increased stitches:

5.     RS: M11, cast off 2, k8, k1 in bl, k to last 2 sts, k2tog.                                 

6.     WS: p2tog, k to last st, p1                                                                            

7.     RS: p1, k to last 2 sts, k2tog

8.    WS: p2tog, p

9.    RS: p1, k to last 2 sts, k2tog

10.   WS: p2tog, p


12 increased stitches:

5    RS: M11, cast off 2, k9, k1 in bl, k to last 2 sts, k2tog.                                 

6   WS: p2tog, k to last st, p1                                                                            

7    RS: p1, k to last 2 sts, k2tog

8    WS: p2tog, p

9    RS: p1, k to last 2 sts, k2tog

10  WS: p2tog, p


Continue in the same way until you´ve made an increase of 17 stitches.
 Next row: cast off loosely.


Now it´s time to finish off next side.


Put all stitches back on the needle and start knitting from the neck (wrong side).


11 increased stitches:

5.     WS: k2 together in the back loops, k to last st, p1                                       

6.     RS: M11, cast off 2, k8, k1 in bl, k to last 2 sts, p2tog                                  

7.     WS: p2tog, p

8.     RS: p to last 2 sts, k2tog

9.     WS: p2tog, p

10.   RS: k to last 2 sts, p2tog


12 increased stitches:

5.   WS: k2 together in the back loops, k to last st, p1                                      

6.   RS: M11, cast off 2, k9, k1 in bl, k to last 2 sts, p2tog                                  

7.   WS: p2tog, p

8.   RS: p to last 2 sts, k2tog

9.   WS: p2tog, p

10. RS: k to last 2 sts, p2tog


Continue in the same way until you´ve made an increase of 17 stitches.
 Next row: cast off loosely.


Block if you wish.


Pattern is for personal use only – pattern may not be changed, sold, cop­ied or other ways shared without my permission = copyright.


Please share where you found the pattern in the first place. Links are so easy to share.


You may sell items made from this pattern in small amounts – Please say, write or in other way tell the buyer who made the pattern when you sell the items.  


Best,

Petra Söreskog/ Chippzan J  


torsdag 15 mars 2018

Croeso Shawlette

Äntligen blockad och färdig att avnjutas . Croeso Shawlette stickad i Baby Merino från Drops.
Mönster hittar du här : https://www.ravelry.com/patterns/library/croeso-lace--cable-shawlette

måndag 26 september 2016

Whimsical Anna´s Shawl - new knitting pattern up and running

This shawl is started as a triangle but when it reaches 33 cm wide it begins to stretch out. It´s divided in two parts and stretched out even more. This makes it a perfect fit for those who don´t like it when it gets too bulky around the neck but still wants that piece of triangle to cover the front when it´s chilly outside. When worn as a shawl over the  shoulders it has long enough sides to wrap around to make it stay comfortable. 

I hope you´ll love the design!

Pattern on Ravelry: http://www.ravelry.com/patterns/library/vimsiga-annas-sjal

Pattern on Craftsy: will soon be up and running - try to use the SEARCH bar for this pattern.

söndag 24 juli 2016

Sharing more pics! These are from Harrietta :)

With permission I´m posting the pics Harrietta sent me the other day. Isn´t it gorgeous?
Pattern: http://chippzan.blogspot.se/2014/08/shawl-with-shells-and-clusters-of.html


She also shared this information:

"I used 11 skeins (2167 yards or 1981.5 meters) in gray of Rowan RYC Cashsoft DK yarn,  and a 3.75mm (F) crochet hook. Dimensions: 84" wide x 40" from top of center back to point.
By all means you can post my name - Harrietta Wright - and my pictures.  Thank you."

Thank you for sharing pics and info!


tisdag 19 juli 2016

Sharing a pic of a gorgeous shawl made of Pam

With permission from Pam I´m posting the pic she sent me of her gorgeous shawl made of acrylic light worsted and 5 mm hookI just LOVE it! 


It´s much appreciated to recieve emails of your work.

If you want to share your work/pics, just send me an email to 
chippzan9@gmail.com 

or post it on my Facebook 
MADE BY CHIPPZAN page.

Thank you again Pam <3

onsdag 12 augusti 2015

Shawl with shells - photos from Crochet Girl

With permission to post.


Look at this gorgeous shawl, made from the pattern shawl with shells!

Donna Marie Anderson 
aka Crochet Girl 
from Crochet Stitches, 
Thunder Bay, Ontario 

send me these pictures and it´s breathtaking! 
She made it out of Red Heart Boutique Unforgettable in Parrot.

Here´s the link to her Facebook page:

Thank you for sending me the photos in the first place, as I said it really made my day. Giving me permission to post it here on the blog to show it off to the rest of you warms my heart even more. 


Härom dagen fick jag mail från en av mina läsare som gjort sjalen http://chippzan.blogspot.se/2014/08/fardig-sjal-med-snack-och-stolp-partier.html
Hon har virkat den i Red Heart garnet Boutique Unforgettable Parrot. Helt fantastiskt vacker!

Donna Marie Anderson är Crochet Girl från Crochet Stitches, Thunder Bay, Ontario. Hon har även en Facebook sida: https://www.facebook.com/CrochetStitchesbytheCrochetGirl.

Med tillåtelse att använda hennes foto och info på bloggen.

tisdag 19 maj 2015

Monica's Shawl - oblockad men klar :-)


Alla 6 ledtrådarna är klara. Visserligen är den oblockad men den är färdig! Stickad i Drops Lace och stickor 3 mm. Det ska bli spännande att se skillnaden när den är blockad.

Mönstret hittar du via Ravelry: http://www.ravelry.com/patterns/library/monicas-shawl

torsdag 30 april 2015

Monica's Shawl KAL


I Facebook gruppen https://www.facebook.com/groups/chippzan/ har vi ett KAL evenemang på gång. Jag stickar redan på Clue 3 fast planen var att börja en ny ledtråd varje fredag. Hos mig har det dock funnits tid och ro att sticka så jag passar på medan det varit lugnt. Haka på vettja! Bara att ansöka om att få komma med i gruppen om du inte redan är med och sen tacka ja till evenemanget fast det är påbörjat. :-)


"Mönster:
https://kudumishoolik.wordpress.com/the-clues-of-monicas-shawl/

Vi stickar sjalen tillsammans och hjälps åt i den mån vi kan. Mönstret är på engelska och är redan uppdelat i 6 ledtrådar, vilket passar utmärkt som KAL.

Planen är att vi börjar på en ny ledtråd varje fredag men ni stickar på i den takt ni vill. Förmodligen kommer ledtrådarna ta längre och längre tid att göra men om tiden inte räcker till så förlänger vi bara evenemanget :-)

Ledtrådar:
24/4 Clue 1
1/5 Clue 2
8/5 Clue 3
15/5 Clue 4
22/5 Clue 5
29/6 Clue 6 - sista ledtråden

Så fort sista ledtråden är avklarad är det dags att blocka våra sjalar. Kanske har vi alla en ny fräsch sjal redan till Nationaldagen, annars har vi ju alltid Midsommar :-)"

tisdag 5 augusti 2014

Shawl - with shells and clusters of double crochet - free pattern


The chart (or similar) has been jumping around in different groups on Facebook. I take no credit of the chart since it belongs to someone else. I've tried to google the pic in my search for the designer but unfortunately no one seems to claim it. The search only led to different russian blogs that seems to only have shared it. If you know who it is, please let me know so the right person gets the credit for it. I find it gorgeous.  J 

This is only my interpretation of the chart so there can be variations, eg instead of treble you can do double crochet througout the pattern. Also, English is not my native language (I'm a Swede) so there will probably be some - or many -  parts that are completely off when it comes to grammar and spelling. Just a heads up.  J


Written in US terms.

Finished size: approx 135 cm/53" along the top edge and 80 cm/31" from center top edge to bottom tip. (It´s not blocked).

Yarn used: acrylic yarn from Stoff & Stil, 100 g/350 m 
I used 210 g for the whole shawl, including the fringes of 10 cm.

Hook: 4 mm/ US F

Abbreviations:

ch = chain
sc = single crochet
dc = double crochet
tr = treble (yarn over twice )

dc cl = cluster (group of dc)
loop/ loops =  A loop is basically the chain from previous row.
skip = skip/jump over what´s written in pattern, 

[....] 4 times =  Repeat what´s written inside the brackets the number of times shown after.
fptr = front post treble 

bptr = back post treble


How to make front post treble: 
Instead of pushing the hook through a stitch, push it between the tr:s in previous row (from the front) and up on the other side of the tr. The tr is now laying on top of the hook.  Yarn over, pull back and finish treble as usual. This way you get an edge structure on the shell. 

Back post treble:
Do as front post treble but from the back. Push the hook from the back, between the tr:s in prev row, up on the other side of the tr. The tr is now laying on top of the hook. Yarn over, pull back and finish treble as usual. 

NOTE! First block of shells are all crocheted in front post trebles, second block is back post trebles, etc.

You do not break yarn anywhere, unless you want to change color. Just turn your work and continue :)

Pattern updated August 14, 2016
I´ve updated the pattern again and hope that this´ll make things easier for you, but if you have questions don´t hesitate to contact me and I´ll try my very best to help you. 

So many readers has reached out and contacted me with questions and/or lots of love for writing this pattern down - from Karen, who made suggestions for the better when I first posted this pattern to just recently - and I want to say THANK YOU to everyone  that´s been in contact with me. You make my day!

Have any more suggestions or find any errors, please contact me at: chippzan9@gmail.com

Start: ch 20, slip stitch to form a ring.     
  1.  ch 3 (= 1 dc), dc 19 in ring. Turn! (20 dc in ring)
  2.  ch 5, tr 1 in dc from prev row, [ch 1, tr 1 in next dc] 19 times. Turn! (20 tr)
  3. ch 6, fptr 1 around first tr in prev row, [ch 2, fptr 1 around next tr] 19 times. Turn! [20 fptr] You have now 1 finished shell. Turn!
  4. ch 10, skip 1 loop, sc 1 in next loop, [ch 8, skip 1 loop, sc 1 in next] 3 times,
    ch 10, skip 3 loops, sc 1 in next loop, [ch 8, sk 1 loop, sc 1 in next] 3 times,
    ch 7, tr 1 in last tr. Turn!
  5. ch 4, dc 9 in loop, sc 1 in next loop, [ch 8, sc 1 in next loop] 2 times,
    dc 20 in large loop, sc 1 in next loop, [ch 8, sc 1 in next loop] 2 times,
    dc 10 in last loop. Turn!
  6. ch 5, tr 1 in next dc, [ch 1, tr 1 in next dc] 9 times,
    ch 1, sc 1 in next loop, ch 8, sc 1 in next loop, [ch 1, tr 1 in next dc] 20 times,
    ch 1, sc 1 in next loop, ch 8, sc 1 in next loop, [ch 1, tr 1 in next dc] 10 times. Turn!
  7. ch 6, fptr 1 around next tr you made in previous row, [ch 2, fptr 1 around next tr] 8 times,
    ch 2, sc 1 in next loop, [ch 2, fptr 1 around next tr] 20 times,
    ch 2, sc 1 in next loop, [ch 2, fptr 1 around next tr] 10 times. Turn!

    You have now 4 finished shells.
  8. ch 10, skip 1 loop, sc 1 in next loop, [ch 8, skip 1 loop, sc 1 in next loop] 3 times,
    ch 10skip 4 loops, sc 1 in next loop, [ch 8, skip 1 loop, sc 1 in next loop] 3 times,
    ch 10skip 3 loops, sc 1 in next loop, [ch 8, skip 1 loop, sc 1 in next loop] 3 times,
    ch 10skip 4 loop, sc 1 in next loop, [ch 8, skip 1 loop, sc 1 in next loop] 3 times,
    ch 6, tr 1 in last stitch. Turn!
  9. ch 4, dc 9 in next loop, sc 1 in next loop, [ch 8, sc 1 in next loop] 2 times,
    dc 10 in next loop, sc 1 in next loop, [ch 8, sc 1 in next loop] 2 times,
    dc 20 in next loop, sc 1 in next loop, [ch 8, sc 1 in next loop] 2 times,
    dc 10 in next loop, sc 1 in next loop, [ch 8, sc 1 in next loop] 2 times,
    dc 10 in last loop. Turn!
  10. ch 6, tr 1 in next dc from previous row, [ch 1, tr 1 in next dc] 9 times,
    ch 1, sc 1 in next loop, ch 8,  sc 1 in next loop, [ch 1, tr 1 in next dc] 10 times,
    ch 1, sc 1 in next loop, ch 8,  sc 1 in next loop, [ch 1, tr 1 in next dc] 20 times,
    ch 1, sc 1 in next loop, ch 8,  sc 1 in next loop, [ch 1, tr 1 in next dc] 10 times,
    ch 1, sc 1 in next loop, ch 8,  sc 1 in next loop, [ch 1, tr 1 in next dc] 10 times. Turn!
  11. ch 6, fptr 1 around next tr in prev. row, (ch 2, fptr 1 around next tr) 8 times,
    ch 2, sc 1 in next lp, (ch 2, fptr 1 around next tr) 10 times,
    ch 2, sc 1 in next lp, (ch 2, fptr 1 around next tr) 20 times,
    ch 2, sc 1 in next lp, (ch 2, fptr 1 around next tr) 10 times,
    ch 2, sc 1 in next lp, (ch 2, fptr 1 around next tr) 10 times. Turn!

    You have now a total of 9 shells - 3 large along the center.
  12. Cluster block: ch 3, dc 2 in first dc, [ch 2, skip 1 loop, dc 3 in next loop] 4 times,
    ch 2, skip 2 loops, dc 3 in next loop, [ch 2, skip 1 loop, dc 3 in next loop] 4 times,
    ch 2, skip 2 loops, dc 3 in next loop, [ch 2, skip 1 loop, dc 3 in next loop] 4 times,
    ch 2, [tr 3, ch 2, tr 3] in next loop, ch 2, dc 3 in next loop,
    [ch 2, skip 1 loop, dc 3 in next loop) 4 times, ch 2, skip 2 loops, dc 3 in next loop,
    [ch 2, skip 1 loop, dc 3 in next loop) till end of row, ending row with ch 2, dc 3 in last dc. Turn!
  13. ch 3, dc 2 in first stitch, [ch 2, dc 3 in next loop] 15 times, ch 2, [tr 3, ch 2, tr 3] in center loop, [ch 2, dc 3 in next loop] till end of row, ending row with ch 2, dc 3 in last dc. Turn!
  14. Continue to make clusters in the same way another 5 rows ( = a total of 7 rows of clusters). First cluster is in first dc, [tr 3, ch 2, tr 3] in center loop and end row with ch 2, dc 3 in last dc. Turn!
  15. Next block of shells:ch 2, slip stitch 1 to last dc in cluster, *ch 10, sk 1 loop, sc 1 in next loop, [ch 8, sc 1 in next loop] 3 times*  Repeat *-* a total of 4 times.

    Center:
    ch 10, tr 1 in last tr in first cluster, ch 2, tr 1 in first tr in next cluster.
    *ch 10, skip 1 loop, sc 1 in next loop, [ch 8, sc 1 in next loop] 3 times*  Repeat *-* a total of 4 times. End row: *ch 10, skip 1 loop, sc 1 in first dc in last cluster, slip stitch 1 to first stitch. Turn!
  16. ch 4, dc 9 in loop, sc 1 in next loop, [ch 8, sc 1 in next loop] 2 times,
    *dc 10 in loop, sc 1 in next loop, [ch 8, sc 1 in next loop] 2 times. Repeat *-* 3 times.

    Large shell in center:
    dc 9 in loop, dc 1 in tr, ch 2, dc 1 in tr, dc 9 in loop,
    [ch 8, sc 1 in next loop] 2 times,
     *dc 10 in loop, sc 1 in next loop, [ch 8, sc 1 in next lp] 2 times. Repeat *-* 3 times, dc 9 in last loop, dc 1 in last stitch. Turn!
  17. ch 6, tr 1 in next dc, [ch 1, tr 1 in next dc] 9 times,
    *ch 1, sc 1 in next loop, ch 8, sc 1 in next loop, [ch 1, tr 1 in next dc] 10 times*, repeat *-* 3 times, ch 2 in center*ch 1, sc 1 in next loop, ch 8, sc 1 in next loop, [ch 1, tr 1 in next dc] 10 times*. Repeat *-* 4 times. Turn!
  18. ch 6, bptr 1, [ch 2, bptr 1] 8 times,
    *ch 2, sc 1 in loop, [ch 2, bptr 1] 10 times*. Repeat *-* over all shells, ch 3.

    Large shell in center: [ch 2, bptr 1] 20 times
    ch 3, sc 1 in loop, [ch 2, bptr 1] 10 times
    *ch 2, sc 1 in loop, [ch 2, bptr 1] 10 times*. Repeat *-* over all shells. Turn!

    Another round of shells are done.
  19. Text marked in bold = Very first shell in first row of new shells. Repeat in all new rows of shells.

    ch 2, sc 1 in next loop, ch 10, sc 1 in next loop, [ch 8, sk 1 lp, sc 1 in next loop] 3 times.

    *ch 10, skip 4 loops, sc 1 in next loop, [ch 8, skip 1 loop, sc 1 in next loop] 3 times*. Repeat *-* 3 times,
    ch 10, skip 3 loops, sc 1 in next loop, [ch 8, skip 1 loop, sc 1 in next loop] 3 times,
    ch 10, skip 2 bptr and tr 1 in 3:rd bptr, ch 2, tr 1 in next bptr, ch 10, skip 2 loops, sc 1 in next loop,[ch 8, skip 1 loop, sc 1 in next loop] 3 times,
    ch 10, skip 3 loops, sc 1 in next loop, [ch 8, skip 1 loop, sc 1 in next loop] 3 times,
    ch 10, skip 4 loops, sc 1 in next loop, [ch 8, skip 1 loop, sc 1 in next loop] 3 times*. Repeat *-* 4 times.
    End row with ch 10, sc 1 in last loop, slip stitch 1 to last stitch. Turn!
  20. Continue as before: *dc 10, sc 1 i loop, [ch 8, sc 1 in loop] 2 times* Repeat *-* until you reach the center shell: dc 10, ch 2 in center, dc 10, [sc 1 in loop, ch 8] 2 times, sc 1 in loop. After center shell, continue with *dc 10, sc 1 i loop, [ch 8, sc 1 in loop] 2 times* Repeat *-* till end of row. Turn!
  21. *[tr 1, ch 1] 10 times, sc 1 in loop, ch 8, sc 1 in next loop* Repeat *-* till center where you make ch 2 insted of 1.
    *[tr 1, ch 1] 10 times, sc 1 in loop, ch 8, sc 1 in next loop* Repeat *-* till end of row. Turn!
  22. *[bptr 1, ch 2] 10 times, sc 1 in loop, ch 2* Repeat *-* till center where you'll bptr 20 in the large shell, ch 2, sc 1 in loop *[bptr 1, ch 2] 10 times, sc 1 in loop, ch 2* Repeat *-* till end of row. Turn!
Continue to make another row of shells according to row 19 - 22. Each time there will be an increase of one shell along the sides. 


Repeat the block of clusters from row 12. Ignore the amount of times, it'll not measure up since you've increased number of shells along the way. Just keep track on beginning, center and end of rows and you'll be fine. 

Repeat amount of shell- and cluster blocks until you're happy with your size. Of course you can make more or less rows of shells and clusters, use your imagination and creation. This is just one version of many :-)

Happy crocheting!

Found errors in the text? Please let me know. Sometimes I mix things up and end up with "Swenglish". I don't see it myself. LOL